Announcement

Collapse
No announcement yet.

Changing Trem Posts

Collapse
X
 
  • Filter
  • Time
  • Show
Clear All
new posts

  • Changing Trem Posts

    I want to change the trem posts in my MIJ Charvel (which came with a Takeuchi trem) to the OFR trem posts. I noticed that the threads of the OFR trem posts are at a much narrower pitch than those on the trem posts that I just took out of the guitar. So it looks like I'm going to have to change out the trem post anchors as well.

    I read the sticky about removing trem post anchors here:


    How do I put the new ones in? Should I just bang on them with a rubber mallet?

    Thanks in advance!
    QR
    Until you get weaned off the boobie, you are going to have to do what the wife wants too. -Rsmacker

  • #2
    That's what I did - but I was later told that the wood can split easilly if you just hammer away. The problem is that the OFR bushings are wider than the Takeuchi ones. I think the general opinion on correct procedure is to drill the holes out larger and then hammer them in.

    Comment


    • #3
      The correct drill bit for OFR bushings is 25/64". I prefer pressing them in rather than hammering, but plenty of people do fine with a rubber mallet.

      Comment


      • #4
        dg is correct.... If you have a drill press you can use that to press them in.

        Comment


        • #5
          Thanks for all of the tips.

          After removing the Takeuchi post anchors, I measured them with my calipers, and they had outer diameters of 9.5mm, whereas the OFR anchors were 10mm. I figured that I could probably get away with a 0.5mm increase in diameter, and besides, I don't own a drill.

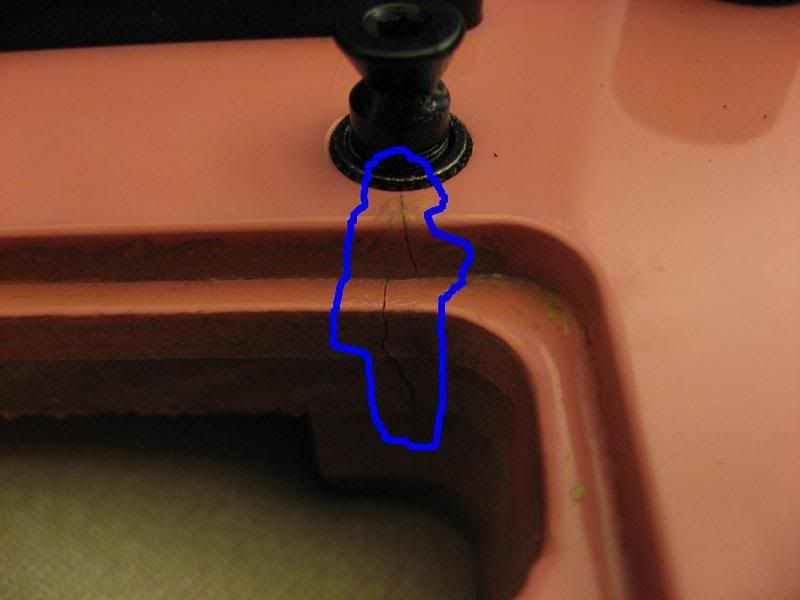
          There were no problems on the low E side, which I did first. Emboldened by this, I happily tapped the high E-side anchor in. And ended up with a hairline crack in the wood

          Now what?
          Until you get weaned off the boobie, you are going to have to do what the wife wants too. -Rsmacker

          Comment


          • #6
            Here's a pic of the crack...


            Is this fixable? Or rather, what can I do to minimize the damage at this point, that is, to prevent this crack from spreading any further?

            I feel bad enough already, so please don't tell me "I told you so!!!"
            Last edited by QuantumRider; 09-30-2006, 09:48 AM.
            Until you get weaned off the boobie, you are going to have to do what the wife wants too. -Rsmacker

            Comment


            • #7
              Fill it with glue... it will be fine.
              And ya should have drilled them first.
              If it were a new unfinished body, .05mm would not have been a big deal.
              Finished bodies are less forgiving.
              -Rick

              Comment


              • #8
                Originally posted by rjohnstone View Post
                Fill it with glue... it will be fine.
                Thanks man...

                Wood glue? Or is Krazy Glue good enough?
                Until you get weaned off the boobie, you are going to have to do what the wife wants too. -Rsmacker

                Comment


                • #9
                  You want a wood glue which will bind the wood fibers. Youll need a water thin glue, you can probably thin it down.
                  Imagine, being able to be magically whisked away to... Delaware. Hi... Im in... Delaware...

                  Comment


                  • #10
                    I don't get it. Why would you need to change the posts anyway? Plenty of people haved used an OFR with the original posts with no problem.
                    I feel my soul go cold... only the dead are smiling.

                    Comment


                    • #11
                      Toejam-

                      I swapped out two JT-6's and the Takeuchi with OFR's. The OFR's that replaced the JT-6's stayed in tune after dive bombs and pull ups. The one that replaced the Takeuchi, however, wouldn't return to the "zero" float position. All other conditions (string gauge, block length, and locking nut) being the same, I figured that the problem was in the posts.
                      Until you get weaned off the boobie, you are going to have to do what the wife wants too. -Rsmacker

                      Comment


                      • #12
                        Ah, I see now.
                        I feel my soul go cold... only the dead are smiling.

                        Comment


                        • #13
                          I agree w/ what Rob said. You need a very thin glue to get deep into the crack. I also recommend pulling the bushing out to allow the crack to compress completely. You want the glue to act as a very thin, tight bond rather than a bridge across the crack. Once the crack is repaired, drill it properly with a good sharp bit & reinstall the bushing. If you don't drill it, you're putting the stress right back on it. You may also want to think about pulling & drilling for the other bushing while you're at it. You got lucky that it didn't crack when you installed it, but it is under stress & may be prone to cracking later under the load of the strings & springs, or down the line as temp & humidity change. JMO.
                          Last edited by dg; 09-30-2006, 03:54 PM.

                          Comment


                          • #14
                            Rob and dg-

                            Thanks for the advice

                            Will make a trip to the hardware store later on today and pick up some wood glue.

                            Also, when I put the anchor back in, I will squeeze it in with my C-clamp vise instead of tapping it in with the rubber mallet.
                            Until you get weaned off the boobie, you are going to have to do what the wife wants too. -Rsmacker

                            Comment


                            • #15
                              I've replaced these bushings quite a few times. I just get some 100-150 grit sandpaper, roll it up so that it will fit in the hole and sand it until the bushing will go about 3/4ths the way in. Then I just tap it in. Works perfectly and have never had any problems.
                              Good deals with:
                              Metal Medal II, Tonyl11

                              Comment

                              Working...
                              X